ラベル ChatGPT の投稿を表示しています。 すべての投稿を表示

2023年11月20日月曜日

奥の物体を描画しなくなるシェーダー(VR,MR向け)

 Shader "Custom/OcclusionShader" {

    Properties{

        _Color("Main Color", Color) = (1,1,1,1)

    }

        SubShader{

            Tags { "RenderType" = "Opaque" }

            LOD 100


            Pass {

                Stencil {

                    Ref 1

                    Comp always

                    Pass replace

                }


                CGPROGRAM

                #pragma vertex vert

                #pragma fragment frag

                #include "UnityCG.cginc"


                struct appdata {

                    float4 vertex : POSITION;

                    float3 normal : NORMAL;

                    UNITY_VERTEX_INPUT_INSTANCE_ID 

                };


                struct v2f {

                    float4 pos : SV_POSITION;

                    UNITY_VERTEX_OUTPUT_STEREO 

                };


                fixed4 _Color;


                v2f vert(appdata v) {

                    v2f o;

                    UNITY_SETUP_INSTANCE_ID(v); 

                    UNITY_INITIALIZE_OUTPUT(v2f, o); 

                    UNITY_INITIALIZE_VERTEX_OUTPUT_STEREO(o); 


                    o.pos = UnityObjectToClipPos(v.vertex);

                    return o;

                }


                fixed4 frag(v2f i) : SV_Target {

                    return fixed4(0,0,0,0); // Render invisible color

                }

                ENDCG

            }


            Pass {

                Stencil {

                    Ref 1

                    Comp notequal

                    Pass keep

                }


                CGPROGRAM

                #pragma vertex vert

                #pragma fragment frag

                #include "UnityCG.cginc"


                struct appdata {

                    float4 vertex : POSITION;

                    float3 normal : NORMAL;

                    UNITY_VERTEX_INPUT_INSTANCE_ID 

                };


                struct v2f {

                    float4 pos : SV_POSITION;

                    UNITY_VERTEX_OUTPUT_STEREO 

                };


                fixed4 _Color;


                v2f vert(appdata v) {

                    v2f o;

                    UNITY_SETUP_INSTANCE_ID(v); 

                    UNITY_INITIALIZE_OUTPUT(v2f, o); 

                    UNITY_INITIALIZE_VERTEX_OUTPUT_STEREO(o); 

                    o.pos = UnityObjectToClipPos(v.vertex);

                    return o;

                }


                fixed4 frag(v2f i) : SV_Target {

                    // Render with object color

                    return _Color;

                }

                ENDCG

            }

    }

        FallBack "Diffuse"

}


2023年11月17日金曜日

GPT-4Vを使ってカメラ画像とテキストを用いて対話する

 using UnityEngine;

using System.Collections;

using UnityEngine.Networking;

using System;

using TMPro;

using Newtonsoft.Json;

using System.Collections.Generic; 


public class ImageRequester : MonoBehaviour

{

    private string apiURL = "https://api.openai.com/v1/chat/completions";

    private string apiKey = "APIKey"; 

    public Camera mainCamera;

    public RenderTexture renderTexture;

    public TMP_Text tmpText;

    public bool TextVisible = false;


    private List<Message> conversationHistory = new List<Message>();


    [System.Serializable]

    public class ChatRequest

    {

        public string model = "gpt-4-vision-preview";

        public Message[] messages;

        public int max_tokens = 300;

    }


    [System.Serializable]

    public class Message

    {

        public string role;

        public Content[] content;

    }


    [Serializable]

    public class Content

    {

        public string type;

        public string text;

        public ImageURL image_url;

    }


    [Serializable]

    public class ImageURL

    {

        public string url;

    }


    [Serializable]

    public class ResponseData

    {

        public Choice[] choices;


        [Serializable]

        public class Choice

        {

            public Message message;

        }


        [Serializable]

        public class Message

        {

            public string content;

        }

    }


    private string ParseResponse(string response)

    {

        try

        {

            ResponseData data = JsonConvert.DeserializeObject<ResponseData>(response);

            if (data != null && data.choices != null && data.choices.Length > 0 && data.choices[0].message != null)

            {

                return data.choices[0].message.content;

            }

        }

        catch (Exception e)

        {

            Debug.LogError("Error parsing response: " + e.Message);

        }

        return string.Empty;

    }


    void Start()

    {

        conversationHistory.Add(new Message

        {

            role = "system",

            content = new[]

            {

                         new Content { type = "text", text = "あなたは親切なアシスタントです。" }

            }

        });

    }


    public void RequestButtonClicked(string prompt)

    {

        if (tmpText.IsActive())

        {

            tmpText.gameObject.SetActive(false);


        }

        else

        {

            tmpText.gameObject.SetActive(true);

            tmpText.text = "";

            ImageRequestToGPT(prompt);


        }

    }


    public void ImageRequestToGPT(string prompt)

    {


        Debug.Log("Button Clicked. Requesting image description...");


        mainCamera.targetTexture = renderTexture;

        mainCamera.Render();


        RenderTexture.active = renderTexture;

        Texture2D image = new Texture2D(renderTexture.width, renderTexture.height);

        image.ReadPixels(new Rect(0, 0, renderTexture.width, renderTexture.height), 0, 0);

        image.Apply();


        tmpText.text = "Start requesting image description...";


        byte[] imageBytes = image.EncodeToPNG();

        string base64Image = Convert.ToBase64String(imageBytes);


        mainCamera.targetTexture = null;

        RenderTexture.active = null; 


        StartCoroutine(CallOpenAIVisionAPI(prompt,base64Image)); 

        Destroy(image);

    }


    IEnumerator CallOpenAIVisionAPI(string prompt, string base64Image)

    {

        var request = new UnityWebRequest(apiURL, "POST");

        Message newMessage = new Message

        {

            role = "user",

            content = new[]

                     {

                         new Content { type = "text", text = prompt },

                         new Content { type = "image_url", image_url = new ImageURL{url=$"data:image/png;base64,{base64Image}" } }

                     }

        };


        conversationHistory.Add(newMessage);


        Message[] messagesToSend = conversationHistory.ToArray();

        ChatRequest chatRequest = new ChatRequest { messages = messagesToSend };


        var settings = new JsonSerializerSettings

        {

            NullValueHandling = NullValueHandling.Ignore

        };


        string jsonPayload = JsonConvert.SerializeObject(chatRequest, settings);


        Debug.Log("jsonPayload" + jsonPayload);


        request.uploadHandler = new UploadHandlerRaw(System.Text.Encoding.UTF8.GetBytes(jsonPayload));

        request.downloadHandler = new DownloadHandlerBuffer();

        request.SetRequestHeader("Content-Type", "application/json");

        request.SetRequestHeader("Authorization", $"Bearer {apiKey}");


        yield return request.SendWebRequest();


        if (request.isNetworkError || request.isHttpError)

        {

            Debug.LogError($"Error: {request.error}");

        }

        else

        {


            string description = ParseResponse(request.downloadHandler.text);

            Debug.Log("Description: " + description);


            tmpText.text = description;


        }

    }

}


2023年8月24日木曜日

Change the texture group of the selected textures.

 import unreal


# エディタ内で選択されたアセットを取得

selected_assets = unreal.EditorUtilityLibrary.get_selected_assets()


for asset in selected_assets:

    if isinstance(asset, unreal.Texture2D):

        # Texture GroupをCharacterに設定

        asset.set_editor_property('LODGroup', unreal.TextureGroup.TEXTUREGROUP_CHARACTER)

        # アセットの変更を保存

        unreal.EditorAssetLibrary.save_loaded_asset(asset)


 #他の値に変更する場合はTEXTUREGROUP_CHARACTERの代わりに以下のEnumを使用する

 #https://docs.unrealengine.com/4.26/en-US/PythonAPI/class/TextureGroup.html

2023年7月24日月曜日

異なるアーマチュアからボーンの名前をコピーする

import bpy

import math


def find_nearest_bone(target_bone, reference_armature):

    min_distance = float('inf')

    nearest_bone_name = None


    for bone in reference_armature.data.bones:

        distance = (bone.head - target_bone.head).length

        if distance < min_distance:

            min_distance = distance

            nearest_bone_name = bone.name


    return nearest_bone_name


# ArmatureAとArmatureBを取得

armature_a = bpy.data.objects.get("ArmatureA")

armature_b = bpy.data.objects.get("ArmatureB")


# ArmatureAがアーマチュアであることを確認

if armature_a and armature_a.type == 'ARMATURE':

    # ArmatureBがアーマチュアであることを確認

    if armature_b and armature_b.type == 'ARMATURE':


        # ArmatureAのボーンに対して処理を行う

        for bone_a in armature_a.data.bones:

            # ArmatureBの中で一番近いボーンを見つける

            nearest_bone_name = find_nearest_bone(bone_a, armature_b)


            # ボーンの名前を変更

            bone_a.name = nearest_bone_name


    else:

        print("ArmatureB is not an armature.")

else:

    print("ArmatureA is not an armature.")

2023年4月12日水曜日

Copies keyframes of specific frame number of selected bones in pose mode to specified frame numbers.

 import bpy


# キーフレームの番号リスト

keyframe_numbers = [1, 2]  # このリストにコピー先のキーフレーム番号を追加してください。


# アクティブなオブジェクトがアーマチュアであることを確認

if bpy.context.object.type == 'ARMATURE':

    armature = bpy.context.object

    action = armature.animation_data.action


    # 選択中のボーンに対して処理を行う

    for bone in armature.pose.bones:

        if bone.bone.select:

            bone_path = f'pose.bones["{bone.name}"].'


            # キーフレーム10の各F-Curveを探索

            for fcurve in action.fcurves:

                if fcurve.data_path.startswith(bone_path):

                    keyframe_10 = None


                    # キーフレーム10の値を取得

                    for keyframe in fcurve.keyframe_points:

                        if keyframe.co[0] == 10:

                            keyframe_10 = keyframe

                            break


                    # キーフレーム10が見つかった場合

                    if keyframe_10 is not None:

                        # 与えられた番号のリストのキーフレームにコピー

                        for kf_number in keyframe_numbers:

                            fcurve.keyframe_points.insert(kf_number, keyframe_10.co[1])


else:

    print("Error: Active object is not an armature.")


2023年2月2日木曜日

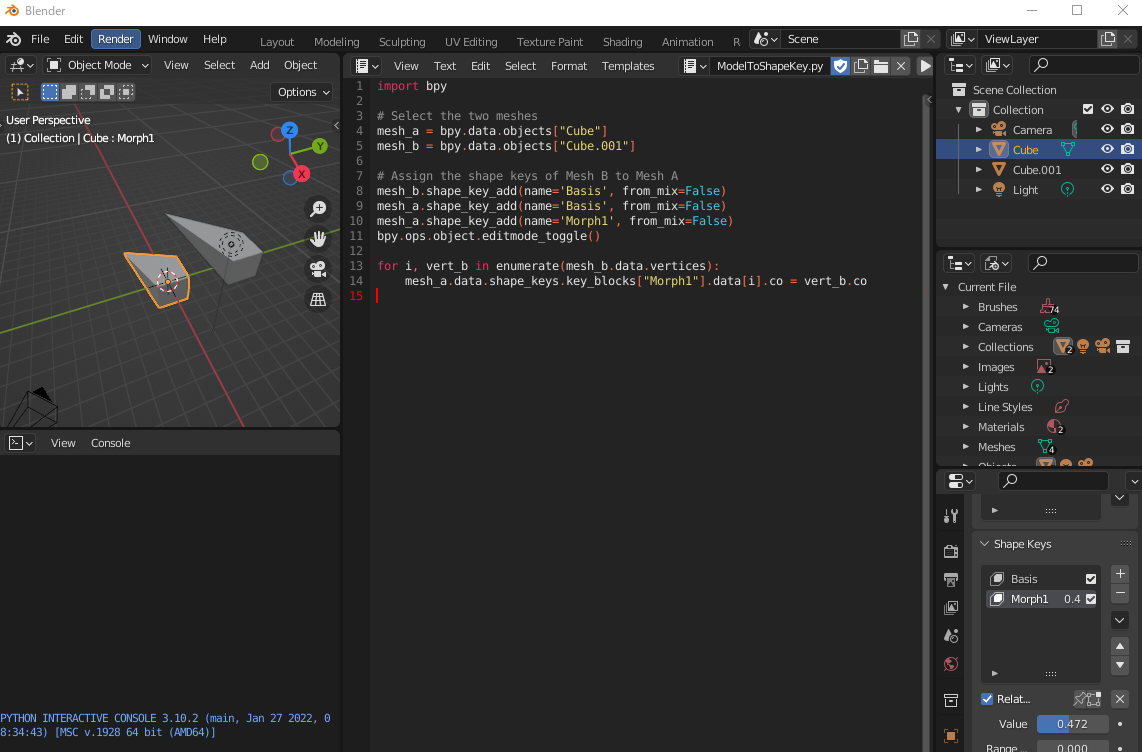
異なるメッシュをShapeKeyのデータにする


import bpy


# Select the two meshes

mesh_a = bpy.data.objects["Cube"]

mesh_b = bpy.data.objects["Cube.001"]


# Assign the shape keys of Mesh B to Mesh A

mesh_b.shape_key_add(name='Basis', from_mix=False)

mesh_a.shape_key_add(name='Basis', from_mix=False)

mesh_a.shape_key_add(name='Morph1', from_mix=False)

bpy.ops.object.editmode_toggle()


for i, vert_b in enumerate(mesh_b.data.vertices):

    mesh_a.data.shape_keys.key_blocks["Morph1"].data[i].co = vert_b.co


2023年1月31日火曜日

時計


時計を描くBlender Pythonスクリプトを書け。

以下は、BlenderのPythonスクリプトを使用して時計を作成する例です。これを修正または変更して、独自の画像を作成することができます。

import bpy
import math
from datetime import datetime

def create_clock():
    # Create a circle for the clock face
    bpy.ops.mesh.primitive_circle_add(radius=2, location=(0,0,0))
    
    # Get the current time
    current_time = datetime.now().time()
    hour = current_time.hour
    minute = current_time.minute
    second = current_time.second
    
    # Create the hour hand
    hour_angle = (hour / 12) * 360
    x = math.sin(math.radians(hour_angle)) * 1.5
    y = math.cos(math.radians(hour_angle)) * 1.5
    bpy.ops.mesh.primitive_cone_add(radius1=0.1, depth=1.5, location=(x, y, 0))
    
    # Create the minute hand
    minute_angle = (minute / 60) * 360
    x = math.sin(math.radians(minute_angle)) * 1.8
    y = math.cos(math.radians(minute_angle)) * 1.8
    bpy.ops.mesh.primitive_cylinder_add(radius=0.1, depth=1.8, location=(x, y, 0))
    
    # Create the second hand
    second_angle = (second / 60) * 360
    x = math.sin(math.radians(second_angle)) * 2
    y = math.cos(math.radians(second_angle)) * 2
    bpy.ops.mesh.primitive_cube_add(size=0.2, location=(x, y, 0))

create_clock()